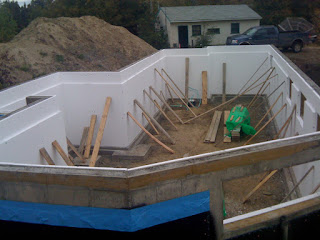
Thursday, September 30, 2010

Plumbing has begun!

Jordan from F&D Plumbing layin' it down.


Our plumber started today!  So, the basement floor is getting busy with plumbing lines.  It may push up the basement floor slab- which is ok, as the windows in my mind are pretty high on the wall.

In other news, I expect to back fill the big mound of clay tomorrow morning.  So much for getting an overall perspective- I've come to enjoy climbing the mound to see the house rise- and the view!

And lastly, a HUGE thanks to my Dad and brother Aly for helping me haul a lift of lumber and tonnes of pieces from the basement to make way for the backfill bobcat and the basement sand.  Phew!

sunrise, 7:48am, Sept. 30, 2010

Tuesday, September 28, 2010

"Door"


Ok, so I don't know why the photos in the previous post won't enlarge (at least for me they won't).

In any case, here's a pic of the label mentioned.

Main Floor Plans -- Not Quite 3-D, but Surreal

A Gorgeous Evening at the Site


Adar and I took advantage of the wonderful weather yesterday to explore our new property and investigate the building progress. I was delighted to note the main floor had been mostly mapped out, complete with labels... like "door."

Main Floor Mapped Out... Mostly
Reading In Bedroom, Note 'Door' Label
Ignoring safety guidelines and throwing caution to the wind, we hopped up and wandered through our various main floor rooms. We traversed the hallway from the front door to the back door, we laid down where our beds will eventually rest, we stepped into closets, and we even walked through walls! Actually, it was very surreal. Knowing which rooms we were in and having no walls to obstruct our views of the valley was simply amazing; this is not an opportunity to be missed and we thoroughly enjoyed it.

Many friendly neighbours were out and about and we fielded several questions. A couple of young women, out walking their dogs, were curious about the floor layout. They began by asking Adar where he was sitting. Easy enough. Adar readily explained that he was currently reading in his bedroom with the room beside him being the Reiki room. And then they had to turn to me and ask where I was sitting. Sigh. You see, at that very moment, I was sitting exactly where the toilet was to be installed and I'm way too honest for my own good! They very politely informed me there were no walls and that I could be seen.
Cloud Gazing From Our Beds

It was an amazing evening with a beautiful sunset.

Saturday, September 25, 2010

I Get My Pantry!?!

When I was a little girl, there were many things I enthusiastically imagined in my dream home and, as I aged, the list only got longer. While the dream of a massive indoor pool complete with diving boards of varying heights has been replaced with a massive array of photovoltaics, some dreams have survived.

I don't recall my first introduction to The Pantry. My family certainly never had a home with one. But, once acquainted, there was no going back... such practicality! Revision after revision, draft after draft, our house floor plans always included some version of a pantry just off the kitchen. In the beginning, in our naivety, it was a walk-in pantry. I quickly came to realise how that is such a waste of square footage and the pantry morphed into a spacious closet-like extension of the kitchen.
 
And Shafraaz and I debated. And we went to IKEA. We have the pantry space, but how to develop it? IKEA offers several options from pull-out pantries to different shelving selections. Having the pantry area was luxury enough for me, I didn't need anything fancy, so I preferred a simple shelving system that could be mixed up and rearranged as needed. A pantry is about utility after all.

And that was where we left it. That is where I thought it was going to remain.

Then one day...

I got a call.
Apparently, during a salvaging trip, Shafraaz scored these "amazing" units and wanted to use them for *my* pantry (see how possessive I've become). And then he confesses that they are a fridge and freezer set? You've got to be kidding me? Haha, he wasn't joking. He wanted me to use a fridge and a freezer as shelving! But they are "gorgeous" and "can we please use them for the pantry... it'd be awesome!"   

Old, Salvaged, Sub-Zero Fridge & Freezer Set
Such excitement, sigh. What could I do but agree to at least see them. And as I stood before this massive Sub-Zero fridge & freezer set, I understood why my favourite-colour-is-black husband loved them. They are big, they are black, and they have simple clean lines. In Shafraaz's eyes they are perfect.

But are they practical?
On the outside they are all nice and shiny and certainly seem large enough, useful enough. They come with their own doors, so we won't need to supply doors/curtains/barriers to hide the pantry; in fact, the bonus purpose of them would be a focal point, a conversation starter. And they were FREE. They were salvaged from an untimely demise. I love reusing what can be reused. Considering that these monsters probably were huge energy hogs, one may be able to argue that we are Upcycling them.

But are they practical?
On the inside...
Complete with a Box of Baking Soda!
If the outsides remain classic and "gorgeous," the insides are certainly dated. But hey,they are clean with no weird smells, the shelves are adjustable, and there is the added bonus of storage space on the doors! It's a pantry... who cares what the inside looks like? And these babies don't take up all the pantry space surprisingly, there will be a small linen-closet like space beside it for those more difficult to store and unwieldy bulk items.  

So, I have my pantry! I'm not positive how well it will actually work, but it's worth a shot. They'll look good in any case and Shafraaz will be happy. Now I just wonder about the air-tight quality of the fridge & freezer-pantry and how that will affect its use, does it matter? Does a pantry need airflow? And what about the coolants and other bits on the fridge&freezer's backsides... do they pose any health risks if they just sit?
Another Look at that Baking Soda!

Thursday, September 23, 2010

Basement wall- method to the madness

Here's a view of the exterior concrete basement wall. I'm trying to keep the poly vapour barrier completely continuous and tight from the basement right to the roof.

It shows the concrete, with 2 layers of 2" expanded polystyrene and a stud wall sandwiching it together, with the joists resting on top.

The polyethylene squeezes between the joist and insulation and will be sealed to the poly on the wall above.

There are already a number of little holes in the poly that will need to be sealed. Lots of work to do!

Progress on Framing

This was taken at 7:45am when I showed up on site.
At 7:45am, I was surprised to see a good 1/4 of the main floor joists in place!  Yay! And by the end of the day, it was 80% sheathed with plywood. The framer is returning on Monday to finish up the floor.

Next steps: plumbing rough-ins and pouring the concrete floors for the basement and main floor.

There are some issues to resolve as the site gets messy.  How do I get the framer and his crew to be very aware of the wood they are using? I'm creating sorted piles of 2x4s of different lengths- and I hope dearly that they will get into the habit of going to pick from the off-cut piles.

I also will emphasize that the site needs to be kept cleaner and even little things like water bottles need to go in blue bags for recycling. Small steps.
By 10am, more joists added!

Its gettin' messy.


Wednesday, September 22, 2010

A pick up truck full of doors!

I was able to salvage these 20 white doors from a house that was demolished in the west end. I will post later on the other great bits and pieces I pulled out of there.

I can't believe they are all weird dimensions. They all vary in width from 27 1/4"  to 33 3/4" wide as well as height, 80"  to 81 3/4".  I guess we will have to cut them down to a consistent height, and have fun making very particular frames for them. The fun never stops!

Any advice on how to cut them down?

And thanks to Zoie & Doug for lending me a big truck to be able to grab these from my friends at Rescom- who stored them for a couple months!

Framing has begun!

Where are the 2x4s?
The framer started today!  Well, not at the crack of 8am as expected... It seems that the 2x4 studs were missing in the delivery of materials. Apparently, the supplier thought this was a "regular basement and joists would just rest on the concrete wall.  So, a couple hours of delay occurred as the framer waited for the studs to show up on site.

Then the framer didn't read the drawings and placed studs at 16" on centre, rather than 24" as shown. Great.

And well, I encountered my first drawing error as a wall was shown as framed into a window. How in the world did I miss that?  Sheesh, what a rookie mistake.

By the end of the day [5:30pm], most of the frost wall was up.

Saturday, September 18, 2010

Another "How to use this?" Post: Small pieces of insulation.

So, after insulating the basement, we have a small amount of rigid insulation left over!

I was surprised at how well the measurements/lengths of the house worked out to fit the 4'x8' sheets of insulation.  I think the trick is to actually use proportions in 4' intervals.

But we still have about 10 pieces ranging from 2'x2' to 3"x2" left over.  What to use them for? stuff the interstitial spaces between floor joists?

Any suggestions/ideas of how we might need them somewhere else?

Basement Insulated!

Matt placing the last piece of insulation!
We should have worn sunglasses. The white was very bright.


Matt and I spent the better part of today putting up expanded polystryrene insulation [EPS] on the inside of the basement walls.  Surprisingly, we finished in a day.

And to think, the quote I got for someone to do this was $3 per square foot! I think I saved about $1500 by having Matt lead the way in putting the insulation up. I was somewhat helpful.

We fastened them to the wood ladder that was formed at the top of the concrete wall, and put up two layers of 2" thick pieces. The stud interior wall will push up against the insulation and keep in in place. Hence, all the wood propping the insulation.

Hopefully, the framer will start on Monday.  I pray there are no gail force winds to destroy our handiwork.

Friday, September 17, 2010

They fixed the damp-proofing. Yay!

Lenbeth Weeping Tile finally fixed the damp-proofing. They put on a 1 foot high peel and stick piece from where finish grade is [and where they should have started the Platon membrane] over top the black stuff.  Hopefully this will stop any water from finding it's way in the many gaps at the top of the Platon installation.
They also screwed in some more clips to keep the Platon tight against the concrete wall.

Lesson learned. I will perhaps supervise more and meet trades on site when I think it's an unconventional material or process I've asked for.

My friend in Beaverlodge put it best: "One of the biggest lessons that I learned on this place was that people who are supposed to know what they are doing, often don’t.  I thought it was a small town thing, and I gave up and just ended up doing stuff myself.  If someone isn’t going to know what they are doing, it may as well be me.  But I was certainly burned by assuming that a “pro” would make the right decision." Thanks Michael for your reflection.

Insulation has Arrived!

The type 2 rigid insulation has arrived- just in time for the cold weather.  I don't look forward to nailing this stuff to the basement wall.  A search for a no or low-VOC adhesive was fruitless.  So, I will be spending the weekend putting this up on the basement wall!  I even pulled out my long-johns for the cold weather that is expected.

Sunday, September 12, 2010

Hilarious article by Scott Adams regarding eco-homes

This was ridiculously funny.

Read the Story here!

[But makes me worry about my large west facing window].

Thanks to Sandra for passing it along!

How would you reuse these?

After the formwork for the foundation wall came down, there were dozens of these little metal clips littering the ground.   I gathered about 4 or 5 kilograms worth!  I also gathered up the straighter concrete and other nails that were strewn across the area.

How would you reuse these clips?

I'm thinking I can put a chain on them and sell  "dogtags"  Any takes at $4.99? [I have to pay for the mortgage somehow!]

I'm shocked at the complete waste of materials that can be observed on construction sites.

Saturday, September 11, 2010

The pipes coming under the footing...


September 11, 2010

Here is an interesting photo of the north east corner of the house.

This is where the mechanical room will be in the basement. It shows:

- the grounding rod- that will be tied to the electrical panel, so that the third prong of all our electrical plug-ins get grounded!

- the water line- the small semi-rigid 3/4" thick umbilical chord to fresh Edmonton water

- the sewer drain. for you know what.

- the weeping tile drain.

This morning I spend a good hour scraping all the clay out of the weeping tile drain.  I wonder why no one bothered to put a cap on it, when the placed it in the ground before the footings were poured. and I fear I will have to dig up the tile on the other side of the wall to ensure it is actually connected.

And while I was on site today, I noticed this little hole.  Who lives or travels through here? It's about 75 mm in diameter.  A mouse?  A squirrel? Hmmm... Any ideas?

Why aren't the foundation deficiencies cleaned up first?

September 10, 2010

When I went to check to see if the foundation passed inspection, I was hoping to see the deficiencies on the platon installation cleaned up.  Nope. But the weeping tile guys decided to put a landscape fabric over the rocks at the base of the footing instead.  What is going on?

I don't even have a quote for this work!  I had passed on a sketch for this idea in lieu of putting a sock on the weeping tile [which they did not do as I hoped]...  The fabric will hopefully stop the silt from clogging the little holes in the weeping tile.

I hope they connected the weeping tile to the T-connection before the covered it all up!  [I'll have to check from the inside, I guess...]

Ah, the saga continues...

Foundation Passed Inspection!

September 10, 2010

Here is beautiful green sticker stuck onto the platon membrane of the foundation, showing the city is ok with us moving to the next stage!  I hope framing will begin on Sept. 20th!

In between time, I want to insulate the foundation walls.  The challenge is now to get a reasonable quote- or I might just have to do it myself!  Any volunteers to help?

Thursday, September 9, 2010

Energy Modeling-in Hot 2000

My friend [and net zero house building guru] Peter Amerongen of Habitat Studio & Workshop and I have been bouncing back and forth on the energy model for this house.  In his mind, you need to aim to be under 10,000 kWh of total energy use to get a house to net zero.  The theory being that it would be feasible to add enough solar power through passive heat gain and PV modules to balance your energy needs.  Well, we're workin' on it.  We're at about 12,000 kWh at the moment.  We still have to fine tune some details.  I have been working on this since last December [2009]!  and energy modeling is to help you design the appropriate building envelope, size of windows, heating system, etc.  It has been useful in making decisions about where to spend money on insulation.

I have to say I'm somewhat frustrated with the energy modeling software [Hot2000] that we have been trying to get work to give us reliable numbers.  A few weeks ago, we were getting really odd numbers.  It turned out that we had to toggle OFF a separate thermostat for the basement.  Now we're getting somewhere.  If you want to see our Hot2000 house report, you can click here!. I also have to thank Conrad Nobert of Green Edmonton blog fame for his thoughts on this too.

Sunday, September 5, 2010

Wood grades in a market of cheap wood

I had an interesting conversation with our wood supplier- Nelson Lumber.  I learned two things:

One: Then don't make finger-jointed studs at the moment, because wood prices are dirt cheap. We were thinking of using finger-jointed wood studs as they are sometime more straight and true than dimensional, standard lumber. They are also made of smaller pieces of wood, allowing for the reuse of wood off cuts.

Two: Because lumber prices are so low, the lumber mills are sneaking in poorer quality grades in their lifts. So, when we want select, clear, number one grade wood, we are going to see some crappy wood mixed in, as they mills try to pawn off the bad stuff.

Apparently, we will just have to put the crap wood aside and have it replaced by Nelson for the next batch.

Saturday, September 4, 2010

Gaghh! another misunderstanding! No sock on the weeping tile!

I went back today to check on progress... And now the have covered the weeping tile will pebbles [I wouldn't call it gravel]...  I had asked for the weeping tile to be covered with a "sock" so the holes in the weeping tile will not get clogged by the silty-clay.  I uncovered some of the pebbles to find no sock!  *Sigh*  So, yet another email to the weeping tile guy... and they didn't fix the wrinkles yet.
I am also wondering about how they will connect the weeping tile to the T- connection that goes to the sump pump.  Man, these guys create more work for themselves!  Someone is going to have to shovel the gravel and get the tile under the sewer line to connect to the T.

Not so pleased with the Platon Installation...


Sept. 1, 2010

I went to review the installation of the damp-proofing today... I wasn't too pleased at how wrinkled the Platon Membrane was applied to the foundation wall.  I could see some seams that are creating gaps when overlapped, and how it wrinkles when the membrane comes down to the footing.  I wonder about how the back filling of the clay/dirt will wrinkle it more. Also, it seems that the corners were not seamed, as stated in the installation guide.
Anyway, I hope Lenbeth Weeping Tile will fix it somehow. Especially, since we are spending almost $2k more for this system!

Where did our long days go? Marking finish grade in the dark...


The guys doing the weeping tile wanted to have the finish grade marked on the concrete walls so they could start to apply the damp-proofing tar and then the Platon polyethylene air-gap membrane.  I ended up doing this after work- and wondered what happened to our long summer days?
It was dusk by the time I was done.

Concrete Basement Walls Unveiled!


The cribber stripped away the form-work for the concrete basement!  It's looking good- no apparent rough spots or issues.