
Thursday, August 26, 2010
How to reuse this glass?
So, when is it going to be done?
 |
| I liked this graphic from the concrete pumper truck. |
My favorite question: When do you get to move in? When is it going to be done?
Ha! How would I know? We are already two weeks behind due to weather holding up the cribber. And well, we'll see how the other trades follow through. My contracting partner Matt isn't promising anything earlier than December 2011, but he's way too conservative. I am hoping we can start living there next summer. I would move there if there was plumbing and power.
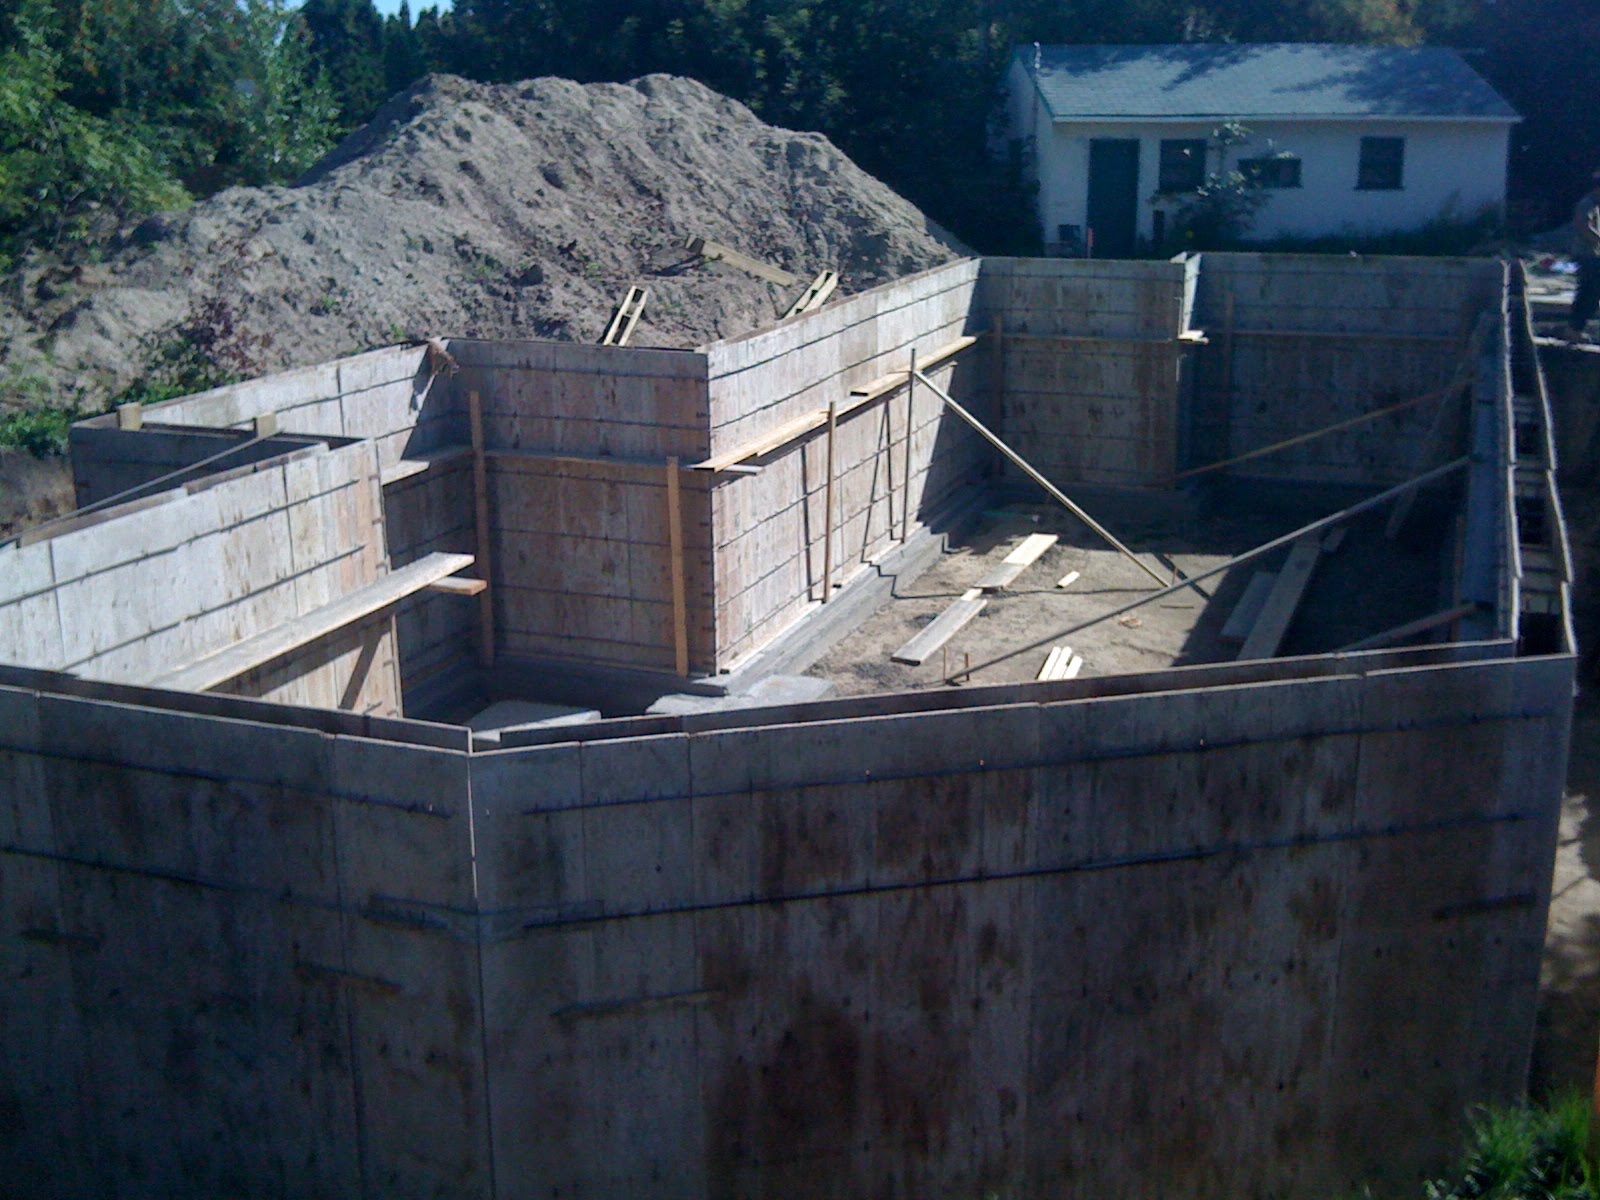
Foundation Walls Are Poured!
 August 26, 2010
The basement foundation walls have been formed and poured! Finally, some nice, hot weather! Here are some photos of progress and the Ken from Albrecht Construction getting the work done. He tells me a 1% plasticizer was added to the concrete mix- as it was a hot day and we
needed the concrete a little wetter than typical.
Now I hope we have the weeping tile and below slab plumbing get installed soon.

Also- a decision needs to be made on damp-proofing!
Should I use the tap/asphalt mopped on stuff?
Or use tar and a platon air gap membrance?
Or pay $2k more for a good peel&stick membrane!
Because we are at the top of the river bank and the water table is far below us, I'm leaning towards the one layer of tar and platon... I'll research and make a decicion by Aug. 29.
Monday, August 23, 2010
footing detail

I have received some questions on what a waterstop and keyway are... This sketch shows my detail. The waterstop is a barrier to any moisture that finds its way in between the footing and foundation wall. The keyway is a little notch in the footing to pour the foundation wall into. And here you can also see how the footing is asymmetrical. I am debating on whether to move all the insulation shown to the inside of the foundation wall [gasp!].
Sunday, August 22, 2010
Another small step forward...


Aug. 20, 2010
Another step forward with the completing the installation of formwork for the basement walls.
Now, does the keyway have to by dry in order to install the water stop? Probably... Grrrr....
Forming the basement walls
 Aug. 16, 2010
More rain delays. So, there was quite a lull in activity since the footing was poured. Patience, patience!
But today was exciting to see work move ahead. The plywood forms for the basement walls are 3/4 done. And it looks like the rains have likely delayed us again.
The first bit of concrete is poured!


Aug. 6, 2010
The first bit of concrete has been poured for the footings! Our nearby neighbour Mary sent me the photo of the pumper truck! And now, the footprint of the house becomes more tangible!
Rebar is being placed in the footing!

The cribber has placed the rebar in the formwork of the footing. In chatting with him, he stated that the rebar I specified [15M & 10M] is far more heavy-duty than standard homes, that shave off as much as possible in costs. He also mentioned typical homebuilders don't put keyways in the top of the footing for the foundation wall to form into. Nor would they specify a waterstop in this keyway, for an extra $670 of material. They would only do this in "high-end" homes. Wow. I just thought these were standard practices. No wonder there are lots of houses with cracking and leaky basement walls!
Cribbing begins. why do they call it cribbing?

The cribber started! Yay! Whenever there are gaps in time between one activity and the next, it feels like forever. I can't believe how slow it is to mobilize certain people- and how start/stop motion it is.
Why do they call it cribbing? Wikipedia wasn't much help. Anyway, Ken the cribber started forming the footings. I changed the footing design somewhat, causing a delay in starting because the materials from the lumber company [Nelson Lumber] didn't arrive. I wanted the load-bearing inside wood stud wall of the basement to land on the footing and not the basement slab, as I had originally drawn it. Hopefully, this will limit the slab movement and cracking to the base of the interior wood stud wall.
Surveying the footings...

July 16, 2010
I helped my surveyor locate all the points/corners for the footings. Down to the millimeter. I wonder why we can be so precise with stakes in the ground, then we're lucky if it comes close to a couple of centimeters for building tolerances.
Excavated!

July 14, 2010
Here is the excavated site. With the first delivery of lumber for forming the footings and foundation wall!
Then the mid-month rains kept our cribber away for a while.
Demolition by excavator


July 12, 2010
We hired Gary Carter Excavating to take down the old house and excavate the basement.
In hindsight, I wish i would have taken down the trees that we needed removed with a chainsaw. The excavator ripped them to shreds. It was also costly to have some of them hauled away.
Another lesson learned is to ask how much hauling charges are- or what a ball park figure would be. I was rather surprised when we got the bill.
But all--in-all, the demolition and excavation was fairly straightforward.
I was a bit nervous about how deep [or rather, shallow,] they would find the sewer line. This ultimately sets how deep the basement slab can be, as well, you-know- poop flows downhill, and you need a slope to to the sewer pipe to create the proper flow. It turned out, the sewer was higher than anticipated, so this in turn bumps up the rest of the house.
The demolition party


We also removed some old doors- my friend Tyler wanted most of them and I managed to pry a couple of the single hung wood windows out.
We also managed to take out a stainless steel sink from the old kitchen, light fixtures, some of the copper piping, some steel pipe and other bits and pieces. Some of the items we can't find a good home for will likely go to the ReStore or Home Re-Usables.
Here are some photos of using the house for stress-relief.
Wednesday, August 18, 2010
The old house had some interesting features.

 The inside of the old house had layer upon layer of wall paper. Pasted onto cardboard. Not plaster & lath, as one would expect.
And it was held up by raw, unpeeled tree trunks! and ask me what I found in the travel trunk left in the basement! It was rather curious...
Renderings [in flux]


Here is a rendering of the house from the front [west side].
And here is a view from the south. We made the sizes of windows as big as possible for solar heat gain and the view. The exterior materials are still in flux. We are likely using hardiepanel/hardieplank, corrugated metal and a mystery material to be revealed at a later date!
Tuesday, August 17, 2010
How it started...


 It started by finding the most amazing site. I still can't believe we saw this lot for sale- in the commercial listings no less- and were able to purchase it.
I have been looking for a lot to build on for a while- thinking I would find something in our current neighbourhood [McCauley]. And we almost did. I did find a lot a few blocks away- at a reasonable price- but this one was spectacular! We jumped on it, after the bank said they would actually give us enough money to build on the site.
It is the very last house on Ada Boulevard's eastern end, a street that hugs the north edge of the North Saskatchewan river valley as it snakes through Edmonton. And it looks out to the city to the west and to the Strathcona refinary to the south. It has excellent solar exposure and there will likely be nothing built to block the sun on this site, as only a road separates the house from the river valley.
Subscribe to:
Posts (Atom)